
OPA can periodically download bundles of policy and data from remote HTTP servers. The policies and data are loaded on the fly without requiring a restart of OPA. Once the policies and data have been loaded, they are enforced immediately. Policies and data loaded from bundles are accessible via the standard OPA REST API.
Bundles provide an alternative to pushing policies into OPA via the REST APIs. By configuring OPA to download bundles from a remote HTTP server, you can ensure that OPA has an up-to-date copy of policies and data required for enforcement at all times.
By default, the OPA REST APIs will prevent you from modifying policy and data loaded via bundles. If you need to load policy and data from multiple sources, see the section below.
See the Configuration Reference for configuration details.
Bundle build
The CLI command opa build gives you the capability to build your own bundles.
Here is a basic example on how to build a bundle from a folder called foo. The bundle will be named by default bundle.tar.gz.
$ ls
example.rego

$ opa build -b foo/
More, you can optimize the bundle by specifying the --optimize or -O flag.
opa build -b foo/ --optimize=1
Finally, you can also sign your bundle with opa build.
opa build --verification-key /path/to/public_key.pem --signing-key /path/to/private_key.pem --bundle foo/
For more information, see the opa build command documentation.
Bundle Service API
OPA expects the service to expose an API endpoint that serves bundles. The
bundle API should allow clients to download bundles at an arbitrary URL. In
combination with a service’s url path.
GET /<service path>/<resource> HTTP/1.1
If the bundle exists, the server should respond with an HTTP 200 OK status followed by a gzipped tarball in the message body.
HTTP/1.1 200 OK
Content-Type: application/gzip
Enable bundle downloading via configuration. For example:
services:
  - name: acmecorp
    url: https://example.com/service/v1
    credentials:
      bearer:
        token: "bGFza2RqZmxha3NkamZsa2Fqc2Rsa2ZqYWtsc2RqZmtramRmYWxkc2tm"

bundles:
  authz:
    service: acmecorp
    resource: somedir/bundle.tar.gz
    persist: true
    polling:
      min_delay_seconds: 10
      max_delay_seconds: 20
    signing:
      keyid: my_global_key
      scope: read
Using this configuration, OPA will fetch bundles from
https://example.com/service/v1/somedir/bundle.tar.gz.
The URL is constructed as follows:
https://example.com/service/v1/somedir/bundle.tar.gz
^^^^^^^^^^^^^^^^^^^^^^^^^^^^^^ ^^^^^^^^^^^^^^^^^^^^^^^^^^^
services[0].url                resource
If the bundles[_].resource field is not defined, the value defaults to
bundles/<name> where the name is the key value in the configuration. For the
example above this is authz and would default to bundles/authz.
Bundle names can have any valid YAML characters in them, including /. This can
be useful when relying on default resource behavior with a name like
authz/bundle.tar.gz which results in a resource of
bundles/authz/bundle.tar.gz.
OPA can optionally persist activated bundles to disk for recovery purposes. To enable
persistence, set the bundles[_].persist field to true. When bundle
persistence is enabled, OPA will attempt to read the bundle from disk on startup. This
allows OPA to start with the most recently activated bundle in case OPA cannot communicate
with the bundle server. OPA will try to load and activate persisted bundles on a best-effort basis. Any errors
encountered during the process will be surfaced in the bundle’s status update. When communication between OPA and
the bundle server is restored, the latest bundle is downloaded, activated, and persisted.
The optional bundles[_].signing field can be used to specify the keyid and scope that should be used
for verifying the signature of the bundle. See this section for details.
See the following section for details on the bundle file format.
Caching
Services implementing the Bundle Service API should set the HTTP Etag header
in bundle responses to identify the revision of the bundle. OPA will include the
Etag value in the If-None-Match header of bundle requests. Services can
check the If-None-Match header and reply with HTTP 304 Not Modified if the
bundle has not changed since the last update.
HTTP Long Polling
With the periodic bundle downloading (ie. short polling) technique, OPA sends regular requests to the remote HTTP
server to pull any available bundle. If there is no new bundle, the server responds with a 304 Not Modified response.
The polling frequency depends on the latency that the client can tolerate in
retrieving updated information from the server. A drawback of this
method is that if the acceptable latency is low, then the polling frequency could add unnecessary
burden on the server and/or network.
HTTP Long Polling helps to minimize server/network resource
usage and also reduces the delay in delivery of updates to the client. When OPA sends a long poll request to the server,
it defers its response until an update is available or timeout has occurred. In case of a timeout, the server responds
with a 304 Not Modified response.
The below configuration shows how to enable bundle downloading via long polling:
services:
  - name: acmecorp
    url: https://example.com/service/v1
    credentials:
      bearer:
        token: "bGFza2RqZmxha3NkamZsa2Fqc2Rsa2ZqYWtsc2RqZmtramRmYWxkc2tm"

bundles:
  authz:
    service: acmecorp
    resource: somedir/bundle.tar.gz
    persist: true
    polling:
      long_polling_timeout_seconds: 10
    signing:
      keyid: my_global_key
      scope: read
With the above configuration, OPA sends a long poll request to the server with a timeout set to 10 seconds. If the server
supports long polling, OPA expects the server to set the Content-Type header to application/vnd.openpolicyagent.bundles.
If the server does not support long polling, OPA will fallback to the regular periodic polling.
Bundle File Format
Bundle files are gzipped tarballs that contain policies and data. The data files in the bundle must be organized hierarchically into directories inside the tarball.
You can list the content of a bundle with tar.
$ tar tzf bundle.tar.gz
.manifest
roles
roles/bindings
roles/bindings/data.json
roles/permissions
roles/permissions/data.json
http
http/example
http/example/authz
http/example/authz/authz.rego
In this example, the bundle contains one policy file (authz.rego) and two
data files (roles/bindings/data.json and roles/permissions/data.json).
The bundle may also contain an optional wasm binary file (policy.wasm).
It stores the WebAssembly compiled version of all the Rego policy files within
the bundle.
Bundle files may contain an optional .manifest file that stores bundle
metadata. The file should contain a JSON serialized object, with the following
fields:
revision- If the bundle service is capable of serving different revisions of the same bundle, the service should include a top-levelrevisionfield containing astringvalue that identifies the bundle revision.roots- If you expect to load additional data into OPA from outside the bundle (e.g., via OPA’s HTTP API) you should include a top-levelrootsfield containing of path prefixes that declare the scope of the bundle. See the section below on managing data from multiple sources. If therootsfield is not included in the manifest it defaults to[""]which means that ALL data and policy must come from the bundle.wasm- A list of OPA WebAssembly (Wasm) module files in the bundle along with metadata for how they should be evaluated. The following keys are supported:entrypoint- A string path defining what query path the wasm module is built to evaluate. Once loaded any usage of this path in a query will use the Wasm module to compute the value.module- A string path to the Wasm module relative to the root of the bundle.
metadata- An optional key that contains arbitrary metadata to accompany the bundle. This metadata is available for querying usingdata.system, along with the rest of the manifest.
For example, this manifest specifies a revision (which happens to be a Git
commit hash) and a set of roots for the bundle contents. In this case, the
manifest declares that it owns the roots data.roles and
data.http.example.authz.
{
  "revision" : "7864d60dd78d748dbce54b569e939f5b0dc07486",
  "roots": ["roles", "http/example/authz"]
}
Another example, this time showing a Wasm module configured for
data.http.example.authz.allow:
{
  "revision": "7864d60dd78d748dbce54b569e939f5b0dc07486",
  "roots": ["roles", "http/example/authz"],
  "wasm": [
    {
      "entrypoint": "http/example/authz/allow",
      "module": "path/to/policy.wasm"
    }
  ]
}
Some important details for bundle files:
OPA will only load data files named
data.jsonordata.yaml(which contain JSON or YAML respectively). Other JSON and YAML files will be ignored.The
*.regopolicy files must be valid ModulesOPA will only load Wasm modules named
policy.wasm. Other WebAssembly binary files will be ignored.
Multiple Sources of Policy and Data
By default, when OPA is configured to download policy and data from a bundle service, the entire content of OPA’s policy and data cache is defined by the bundle. However, if you need to load OPA with policy and data from multiple sources, you can implement your bundle service to generate bundles that are scoped to a subset of OPA’s policy and data cache.
To scope bundles to a subset of OPA’s policy and data cache, include
a top-level roots key in the bundle that defines the roots of the
data namespace that are owned by the bundle.
For example, the following manifest would declare two roots
(acmecorp/policy and acmecorp/oncall):
{
    "roots": ["acmecorp/policy", "acmecorp/oncall"]
}
If OPA was loaded with a bundle containing this manifest it would only erase and overwrite policy and data under these roots. Policy and data loaded under other roots is left intact.
When OPA loads scoped bundles, it validates that:
The roots are not overlapping (e.g.,
a/b/canda/bare overlapped and will result in an error.) Note: This is not enforced across multiple bundles. Only within the same bundle manifest.The policies in the bundle are contained under the roots. This is determined by inspecting the
packagestatement in each of the policy files. For example, given the manifest above, it would be an error to include a policy file containingpackage acmecorp.otherbecauseacmecorp.otheris not contained in either of the roots.The data in the bundle is contained under the roots.
If bundle validation fails, OPA will report the validation error via the Status API.
Debugging Your Bundles
When you run OPA, you can provide bundle files over the command line. This allows you to manually check that your bundles include all of the files that you intended and that they are structured correctly. For example:
opa run bundle.tar.gz
Signing
To ensure the integrity of policies (ie. the policies are coming from a trusted source), policy bundles may be digitally signed so that industry-standard cryptographic primitives can verify their authenticity.
OPA supports digital signatures for policy bundles. Specifically, a signed bundle is a normal OPA bundle that includes
a file named .signatures.json that dictates which files should be included in the bundle, what their SHA hashes are,
and of course is cryptographically secure.
When OPA receives a new bundle, it checks that it has been properly signed using a (public) key that OPA has been configured with out-of-band. Only if that verification succeeds does OPA activate the new bundle; otherwise, OPA continues using its existing bundle and reports an activation failure via the status API and error logging.
Signature Format
Recall that a policy bundle is a gzipped tarball that contains policies and data. A signed bundle
differs from a normal bundle in that it has a .signatures.json file as well.
$ tar tzf bundle.tar.gz
.manifest
.signatures.json
roles
roles/bindings
roles/bindings/data.json
The signatures file is a JSON file with an array of JSON Web Tokens (JWTs) that encapsulate the signatures for the bundle. Currently, you will be limited to one signature, as shown below. In the future, we may add support to include multiple signatures to sign different files within the bundle.
{
  "signatures": [ "eyJhbGciOiJIUzI1NiIsInR5cCI6IkpXVCJ9.eyJmaWxlcyI6W3sibmFtZSI6Ii5tYW5pZmVzdCIsImhhc2giOiJjMjEzMTU0NGM3MTZhMjVhNWUzMWY1MDQzMDBmNTI0MGU4MjM1Y2FkYjlhNTdmMGJkMWI2ZjRiZDc0YjI2NjEyIiwiYWxnb3JpdGhtIjoiU0hBMjU2In0seyJuYW1lIjoicm9sZXMvYmluZGluZ3MvZGF0YS5qc29uIiwiaGFzaCI6IjQyY2ZlNjc2OGI1N2JiNWY3NTAzYzE2NWMyOGRkMDdhYzViODEzNTU0ZWJjODUwZjJjYzM1ODQzZTcxMzdiMWQifV0sImlhdCI6MTU5MjI0ODAyNywiaXNzIjoiSldUU2VydmljZSIsImtleWlkIjoibXlQdWJsaWNLZXkiLCJzY29wZSI6IndyaXRlIn0.ZjtUgXC6USwmhv4XP9gFH6MzZwpZrGpAL_2sTK1P-mg"]
}
The JWT has the standard headers alg (for algorithm), typ (always JWT), and kid (for key id). It has a JSON payload of the
following form:
{
  "files": [
    {
      "name": ".manifest",
      "hash": "c2131544c716a25a5e31f504300f5240e8235cadb9a57f0bd1b6f4bd74b26612",
      "algorithm": "SHA-256"
    },
    {
      "name": "roles/bindings/data.json",
      "hash": "42cfe6768b57bb5f7503c165c28dd07ac5b813554ebc850f2cc35843e7137b1d",
      "algorithm": "SHA-256"
    }
  ]
}
| Field | Type | Required | Description |
|---|---|---|---|
files[_].name | string | Yes | Path of a file in the bundle. |
files[_].hash | string | Yes | Output of the hashing algorithm applied to the file. |
files[_].algorithm | string | Yes | Name of the hashing algorithm. |
scope | string | No | Represents the fragment of signings. |
iat | string | No | Time of signature creation since epoch in seconds. For informational purposes only. |
iss | string | No | Identifies the issuer of the JWT. For informational purposes only. |
The following hashing algorithms are supported:
MD5
SHA-1
SHA-224
SHA-256
SHA-384
SHA-512
SHA-512-224
SHA-512-256
To calculate the digest for unstructured files (ie. all files except JSON or YAML files), apply the hash function to the byte stream of the file.
For structured files, read the byte stream and parse into a JSON structure; then recursively order the fields of all objects alphabetically and then apply the hash function to the result to compute the hash. This ensures that the digital signature is independent of whitespace and other non-semantic JSON features.
To generate a .signatures.json file for policy and data files that will be part of a bundle, see the opa sign command.
Signature Verification
When OPA receives a policy bundle that doesn’t include the .signatures.json file and the bundle is not configured to
use a signature, OPA does not perform signature verification and activates the bundle just as it always has.
If the actual bundle contains the .signatures.json file but the bundle is not configured to use a signature, verification fails.
.signatures.json exists | bundle configured to verify signature | verification performed | result |
|---|---|---|---|
no | no | no | NA |
no | yes | yes | fail |
yes | no | yes | fail |
yes | yes | yes | depends on the verification steps described below |
When OPA receives a signed bundle it opens the .signatures.json file, grabs the JWT and performs the following steps:
Verify the JWT signature with the appropriate public key
Verify that the JWT payload and target directory specify the same set of files
Verify the content of each file by checking the hash recorded in the JWT payload is the same as the hash generated for that file
OPA activates the new bundle only if all the verification steps succeed; otherwise, it continues using its existing bundle and reports an activation failure via the status API and error logging.
The signature verification process uses each of the fields in the JWT header and payload as follows:
files: This list of files in the payload must match exactly the files in the bundle, and for each file the hash of the file must matchkid: If supplied in the header, dictates which key (and algorithm) to use for verification. The actual key is supplied via OPA out-of-bandscope: If supplied in the payload, must match exactly the value provided out-of-band to OPAiat: unused for verification even if present in payloadiss: unused for verification even if present in payload
Signature Plugin
OPA supports the option to implement your own bundle signing and verification logic. This will be unnecessary for most and is intended for advanced use cases, such as leveraging key-related services from cloud providers. To implement your own signing and verification logic, you’ll need to extend OPA. Here is an example to get you started.
When registering custom signing and verification plugins, you will need to register the Signer and the Verifier under the same plugin key, because the plugin key is stored in the signed bundle and informs OPA which Verifier is capable of verifying the bundle, e.g.
bundle.RegisterSigner("custom", &CustomSigner{})
bundle.RegisterVerifier("custom", &CustomVerifier{})
Delta Bundles
A regular snapshot bundle represents the entirety of OPA’s policy and data cache. When a new snapshot bundle is
downloaded, OPA will erase and overwrite all the policy and data in its cache before activating the new bundle. We can
optionally scope the bundle to a subset of OPA’s policy and data cache by defining the roots in the bundle’s manifest.
Although OPA caches snapshot bundles to avoid unnecessary retransmission, servers must still retransmit the entire snapshot when any change occurs. If you need to propagate small changes to bundles without waiting for polling delays, consider using delta bundles in conjunction with HTTP Long Polling.
Delta bundles provide a more efficient way to make data changes by containing patches to data instead of snapshots.
Delta bundles are similar to snapshot bundles in terms of structure and layout semantics. A delta bundle contains a
single patch.json file at the root of the bundle which includes a JSON Patch
(i.e., an array of JSON objects). The operations in the JSON Patch will be applied to OPA’s in-memory store in order.
Delta bundles currently support updates to data only and not on policies. Hence, by leveraging delta bundles along with
HTTP Long Polling, bundle services can propagate data changes to OPAs more quickly and efficiently.
Delta Bundle File Format
OPA expects a delta bundle to contain an optional .manifest file and a required patch.json file that specifies a list of
patch operations on the data. OPA will generate an error if a delta bundle contains any policy, data or wasm binary files.
If the .manifest file specifies any roots, any data patch outside the bundle’s roots will cause an error.
$ tar tzf bundle.tar.gz
.manifest
patch.json
Below is an example of the patch.json file:
{
  "data": [
    {"op": "upsert", "path": "/a/b", "value": ["hello", "world"]},
    {"op": "remove", "path": "/a/c"}
  ]
}
If OPA has previously activated a snapshot bundle that did not contain a .manifest file, then the delta bundle
must not contain a .manifest file.
If OPA has a previously activated snapshot bundle that did contain a .manifest file, then the delta bundle may
contain a .manifest file. Specifically if a previously activated snapshot bundle contains a .manifest file that
declares roots or wasm fields, a delta bundle update MUST have the same values for the manifest
roots and wasm fields from the original snapshot bundle. This means a delta bundle cannot be used to change
the scope of the original bundle or update Wasm resolvers. A delta bundle can however contain different
values for the bundle’s revision and metadata.
Delta Bundle Patch Operations
Each patch operation defined in the patch.json file must have exactly one op member which indicates the
operation to perform. Valid options include:
| op | Description |
|---|---|
"remove" | The "path" specified will be removed from OPA’s in-memory store. The "value" field is ignored for "remove" operations. |
"replace" | The value at the specified "path" will be replaced by the new value defined by the "value" field. The target path must exist for the operation to be successful. |
"upsert" | The "value" will be set at the specified "path". If the "path" specifies an array index, the "value" is inserted into the array at the specified index. If the "path" specifies an object member that does not already exist, a new member is added to the object. If the object member exists, its value is replaced. If the "path" does not exist, OPA will create and add it to its in-memory store. |
The "path" field defines a JSON pointer path to the location to perform the operation on.
The "value" field defines the value to be added or replaced. Only required for "upsert" and "replace" operations.
Limitations
Delta bundles only support updates to data
Delta bundles do not support bundle signing
Unlike snapshot bundles, activated delta bundles are not persisted to disk when the
bundles[_].persistfield istrue
Delta Bundle FAQ
This section discusses some delta bundle usage, edge cases and failure scenarios.
- What happens if OPA cannot apply a data patch ?
Bundle activation will fail in this scenario. In the next attempt to download the bundle, OPA will set the value
of the If-None-Match header of the bundle request to the last successful activation Etag value. This should help the
Bundle Service to send the correct revision of the bundle to OPA.
- What happens if OPA cannot reach the Bundle Service (for example. network failure) or is unable to download a bundle ?
OPA always includes the last successful activation Etag value in the bundle request. When OPA eventually reconnects
with the server, the value of the If-None-Match header of bundle request could be empty indicating that OPA was not
able to activate the first revision of the bundle itself. This helps the server to re-transmit the correct bundle revision.
In case OPA has already activated a revision of the bundle, and reaches out to the server with the last
successful activation Etag value, the server now knows to send the next bundle revision. This could either be a snapshot
or delta bundle. One possible approach on the server-side, would be to first send a snapshot bundle and then send delta bundles
to perform data patch operations. The server could maintain the order in which the bundles should go out for example,
assigning an Etag value to each bundle revision. Hence, it can figure out the right bundle to send by looking up the
If-None-Match header of bundle request and then lining-up the next bundle in the queue.
- Does a delta bundle always need to be preceded by a snapshot bundle ?
No. OPA will activate a delta bundle if all the patch operations in it were successfully applied. Note that a snapshot
bundle would erase and overwrite policy and data under the manifest roots.
Implementations
The Bundle API is simple. Most HTTP servers capable of serving static files will do. While not strictly required in all deployments, it is also good if the implementation supports:
- HTTP caching using the ETag header. This keeps OPA from having to download a bundle unless the bundle’s content have changes.
- Authentication. When exposing a bundle at a remote endpoint, it is often desirable to protect the data by requiring all requests to the endpoint to be authenticated.
This document lists some of the more common HTTP servers suitable as bundle servers, along with instructions for how to set them up as such.
Amazon S3
OPA Bundle Support
| Feature | Supported |
|---|---|
| Caching headers | Yes |
| Authentication methods | AWS Signature |
Setup Instructions
- Search for “S3” and on the “Buckets” page, click “Create bucket”.
- Fill in the form according to your preferences (name, region, etc).
- Either choose “Block all public access” for internal systems, or unmark the checkbox for that to allow external (authenticated) requests.
- You can now upload your bundle to the bucket. If you try to download it right away you’ll notice that by default you’re unauthorized to do so.
- To allow anyone to read the bundle, click on it and select “Make public” from the “Object actions” dropdown menu. If not, proceed to configure authentication.
Authentication
Authentication can be configured to either use the credentials of a service account stored in the environment, or to use credentials fetched from the AWS metadata API. The latter is only available from services running inside of AWS (on EC2 or ECS).
Both methods are going to need a policy for either the service account or the IAM role, so when that is mentioned in the steps for either method you may refer to the example below.
Example IAM policy
{
    "Version": "2012-10-17",
    "Statement": [
        {
            "Effect": "Allow",
            "Action": [
                "s3:ListBucket"
            ],
            "Resource": [
                "arn:aws:s3:::my-example-opa-bucket"
            ]
        },
        {
            "Effect": "Allow",
            "Action": [
                "s3:PutObject",
                "s3:GetObject"
            ],
            "Resource": [
                "arn:aws:s3:::my-example-opa-bucket/*"
            ]
        }
    ]
}
NOTE: The above policy permits both uploads and downloads, which is good for testing. The OPA client however needs only the s3:GetObject permission for downloads and should be the only permission granted for production use cases.
Environment Credentials
- Go to the “IAM” section of the AWS console. Choose “Users” and “Create new user”. Select a name for the user, and the “Programmatic access” option.
- On the following “Permissions” page, choose “Attach existing policies directly” and then press “Create policy”. Select the JSON tab and paste a policy like the example shown above, replacing
my-example-opa-bucketwith the name of your bucket. - Once the policy has been created, it can be assigned to the user. With the user having been created, make sure to note down the AWS access key ID and the AWS secret access key, as they will be the credentials used for authentication.
Metadata Credentials
- Go to the “IAM” section of the AWS console. Choose “Roles” and “Create role”. For type, select “AWS service” and for use case, choose EC2, or wherever you’ll be running OPA.
- On the following “Permissions” page, choose “Create policy”. Select the JSON tab and paste a policy like the example shown above, replacing
my-example-opa-bucketwith the name of your bucket. - Once the policy has been created, it can be assigned to the role.
- With the role created, go to the EC2 instance view. Select an instance where OPA will run and select “Actions” -> “Security” -> “Modify IAM role”. Select the role created in previous steps.
Testing Authentication
Use the AWS CLI tools (see “Upload Bundle” below).
Upload Bundle
Bundle uploads to S3 are easily facilitated using the aws command in the AWS CLI tools.
aws --profile=opa-service-account s3 cp bundle.tar.gz s3://my-example-opa-bucket/
Example OPA Configuration
Environment Credentials
With the environment variables AWS_REGION, AWS_ACCESS_KEY_ID and AWS_SECRET_ACCESS_KEY set, the following configuration will extract the credentials from the environment.
services:
  s3:
    url: https://my-example-opa-bucket.s3.eu-north-1.amazonaws.com
    credentials:
      s3_signing:
        environment_credentials: {}

bundles:
  authz:
    service: s3
    resource: bundle.tar.gz
NOTE: the S3 url is the bucket’s regional endpoint.
Metadata Credentials
In order for this to work it is required that the permissions you created in the “Authentication” steps above are embedded in an IAM Role, which is then assigned to the EC2 instance hosting OPA.
services:
  s3:
    url: https://my-example-opa-bucket.s3.eu-north-1.amazonaws.com
    credentials:
      s3_signing:
        metadata_credentials:
          aws_region: eu-north-1
          iam_role: my-opa-bucket-access-role

bundles:
  authz:
    service: s3
    resource: bundle.tar.gz
NOTE: the S3 url is the bucket’s regional endpoint.
Credential Provider Chaining
Multiple AWS credential providers can be configured. OPA will follow an internally defined order to try each of the credential provider given in the configuration till success. Following order of precedence is followed when multiple credential provider is given in the configuration
- Environment Credential
- Web Identity Credential
- Profile Credential
- Metadata Credential
services:
  s3:
    url: https://my-example-opa-bucket.s3.eu-north-1.amazonaws.com
    credentials:
      s3_signing:
        metadata_credentials:
          aws_region: eu-north-1
          iam_role: my-opa-bucket-access-role
        environment_credentials: {}

bundles:
  authz:
    service: s3
    resource: bundle.tar.gz
NOTE: In this example, OPA will look for AWS credentials in the environment first before trying metadata endpoint. S3 signing will fail if none of the providers are successful.
Google Cloud Storage
OPA Bundle Support
| Feature | Supported |
|---|---|
| Caching headers | Yes |
| Authentication methods | GCP Metadata Token OAuth2 JWT Bearer Grant Type |
Setup Instructions
- In the left pane menu, choose “Cloud Storage”. Click “New bucket”.
- Fill in the form according to your preferences (name, region, availability, etc).
- Once the bucket is created, you can press “Upload” to upload a test bundle. Clicking this will provide a link to the bundle which you can use in your OPA configuration.
- At this stage you can either choose to make the bucket public (by clicking “Permissions”) or to configure a service account for authenticated access.
Authentication
GCP Metadata Token Authentication
If your instance of OPA runs inside GCP, you’ll be able to authenticate using GCP metadata tokens. These tokens by default carry all the permissions granted to the default service account, so you might still want to create a dedicated service account for this purpose (see JWT Bearer Grant Type below).
JWT Bearer Grant Type
Use this for authenticating external clients, i.e. OPAs running outside the GCP environment.
- Search for “credentials” in the top search box and choose “Credentials - APIs and Services”.
- Click “Create Credentials” followed by “Service Account.”
- Fill in a name for the account and proceed to select roles.
- Choose “Storage Object Viewer” for read access and “Storage Object Creator” for write access (if scripted uploads is desired).
- Click the newly created service account and then the “Keys” tab. Press “Add Key” and either “Create new” or upload an existing one.
- If creating new, choose to download the private key in JSON format (not P12).
- Open the JSON file just downloaded and copy the PEM encoded value of the
private_keyattribute. This is the key you’ll use for your OPA configuration.
Testing Authentication
The easiest way of testing GCP metadata token or JWT bearer grant type authentication is simply to set up OPA with config for these and run the server.
Upload Bundle
Uploading a bundle is trivial with the gsutil command included with the Google Cloud SDK.
gsutil cp bundle.tar.gz gs://<bucket-name>/
Example OPA Configuration
GCP Metadata Token Authentication
services:
  gcs:
    url: https://storage.googleapis.com/storage/v1/b/${BUCKET_NAME}/o
    credentials:
      gcp_metadata:
        scopes:
          - https://www.googleapis.com/auth/devstorage.read_only

bundles:
  authz:
    service: gcs
    # NOTE ?alt=media is required
    resource: 'bundle.tar.gz?alt=media'
Google Cloud Storage Bundle and JWT Bearer Authentication
services:
  gcp:
    url: https://storage.googleapis.com/storage/v1/b/${BUCKET_NAME}/o
    credentials:
      oauth2:
        grant_type: jwt_bearer
        token_url: https://oauth2.googleapis.com/token
        signing_key: jwt_signing_key # references the key in `keys` below
        scopes:
        - https://www.googleapis.com/auth/devstorage.read_only
        additional_claims:
          aud: https://oauth2.googleapis.com/token
          iss: opa-client@my-account.iam.gserviceaccount.com

bundles:
  authz:
    service: gcp
    # NOTE ?alt=media is required
    resource: 'bundle.tar.gz?alt=media'

keys:
  jwt_signing_key:
    algorithm: RS256
    private_key: ${BUNDLE_SERVICE_SIGNING_KEY}
Azure Blob Storage
OPA Bundle Support
| Feature | Supported |
|---|---|
| Caching headers | Yes |
| Authentication methods | OAuth2 Client Credentials, OAuth2 Client Credentials JWT authentication |
Note that for the time being, the Shared Key or Shared Access Signature (SAS) options are not supported.
Setup Instructions
- Any type of storage in Azure is grouped in Storage Accounts. If you have one already, skip to step 3.
- From the Azure console, select “Storage Accounts” followed by “New”. Fill in the form (name, region, etc) according to your preferences. One thing to note when selecting “account kind”, make sure to pick the Storage V2 (general purpose v2) option and not the legacy BlobStorage kind.
- With the storage account deployed, press “Go to resource” to create a new storage resource.
- Select “Containers” and press the plus sign to create a new storage container.
- Name your container and select access level. Choose “Private” to require authentication, or “Blob” to allow unauthenticated read access.
- Press “upload” and select the bundle from your local filesystem.
- Clicking the filename should bring up a properties window where the public URL to the bundle is included.
Authentication
- Go to Azure Active Directory.
- In the left menu, click “App Registrations” followed by “New Registration”. Name your app (client) amd leave the other options be. Click “Register”.
- Click “Certificates and Secrets”. Either create a secret to be used for OAuth2 Client Credentials or upload a certificate for OAuth2 Client Credentials JWT authentication.
- In the menu to the left, click “API permissions”. Click “Add a permission”. Choose “Azure Storage” and check the “user_impersonation” checkbox.
- Click “Add admin consent for Default Directory”. Answer Yes on the followup question.
- Navigate back to your storage account. Click “Access Control (IAM)”. Click “Add role assignments”.
- Select the “Storage Blob Data Contributor” role. Leave “Assign access to” as “User, group or service principal”. Search and select the name of the app created in step 2.
- Configuration is now complete. Go back to “App Registrations” in the Active Directory view to check details like tenant ID, application ID and endpoints. You’ll need those when configuring OPA (see Example Configuration below).
Testing Authentication
Use Curl to test client authentication with a secret.
curl --silent \
     --data "grant_type=client_credentials&client_id=$CLIENT_ID&client_secret=$CLIENT_SECRET&scope=https://storage.azure.com/.default" \
     "https://login.microsoftonline.com/$TENANT_ID/oauth2/v2.0/token"
Upload Bundle
Uploading bundles to Azure Blob storage is easily done using the azcopy tool. Make sure to first properly authorize the user to be able to upload to Blob storage.
By now you should be able to login interactively using azcopy login --tenant-id <Active Directory tenant ID>. Since you’ll most likely will want to log in from scripts (to upload bundles programmatically), you should however create an Azure AD application, and a service principal to do so. Good news! If you’ve followed the Authentication steps above, you already have one.
Uploading bundle using client secret authentication
AZCOPY_SPA_CLIENT_SECRET='<application_client_secret>' azcopy login \
  --service-principal \
  --tenant-id <tenant-id> \
  --application-id <application-id>

azcopy copy bundle.tar.gz https://<storage-account-id>.blob.core.windows.net/<container-id>/bundle.tar.gz
Uploading bundle using client certificate authentication
AZCOPY_SPA_CERT_PASSWORD='<client_cert_password>' azcopy login \
  --service-principal \
  --tenant-id <tenant-id> \
  --certificate-path <path-to-certificate-file> --tenant-id <tenant-id>

azcopy copy bundle.tar.gz https://<storage-account-id>.blob.core.windows.net/<container-id>/bundle.tar.gz
Uploading bundle using Curl
token=$(curl --silent \
             --data "grant_type=client_credentials&client_id=$CLIENT_ID&client_secret=$CLIENT_SECRET&scope=https://storage.azure.com/.default" \
             "https://login.microsoftonline.com/$TENANT_ID/oauth2/v2.0/token" | jq -r .access_token)

curl --silent \
     -X PUT \
     --data-binary "@bundle.tar.gz" -H "X-Ms-Version: 2020-04-08" -H "Authorization: Bearer $token" \
     https://styra.blob.core.windows.net/opa/bundle.tar.gz
Example OPA Configuration
Azure Blob Storage Bundle and Client Credentials Authentication
services:
  blob:
    url: https://my-storage-account.blob.core.windows.net
    headers:
      # This header _must_ be present in all authenticated requests
      x-ms-version: "2020-04-08"
    credentials:
      oauth2:
        token_url: "https://login.microsoftonline.com/${TENANT_ID}/oauth2/v2.0/token"
        client_id: "${CLIENT_ID}"
        client_secret: "${CLIENT_SECRET}"
        scopes:
          - https://storage.azure.com/.default

bundles:
  authz:
    service: blob
    resource: my-container/bundle.tar.gz
Note that the $CLIENT_ID is what is referred to as the “Application ID” inside your Azure account.
Azure Blob Storage Bundle and Client Credentials JWT Authentication
keys:
blob_key:
algorithm: RS256
private_key: "${PRIVATE_KEY_PEM}"
services:
blob:
url: https://my-storage-account.blob.core.windows.net
headers:
# This header _must_ be present in all authenticated requests
x-ms-version: "2020-04-08"
credentials:
oauth2:
token_url: "https://login.microsoftonline.com/${TENANT_ID}/oauth2/v2.0/token"
signing_key: blob_key
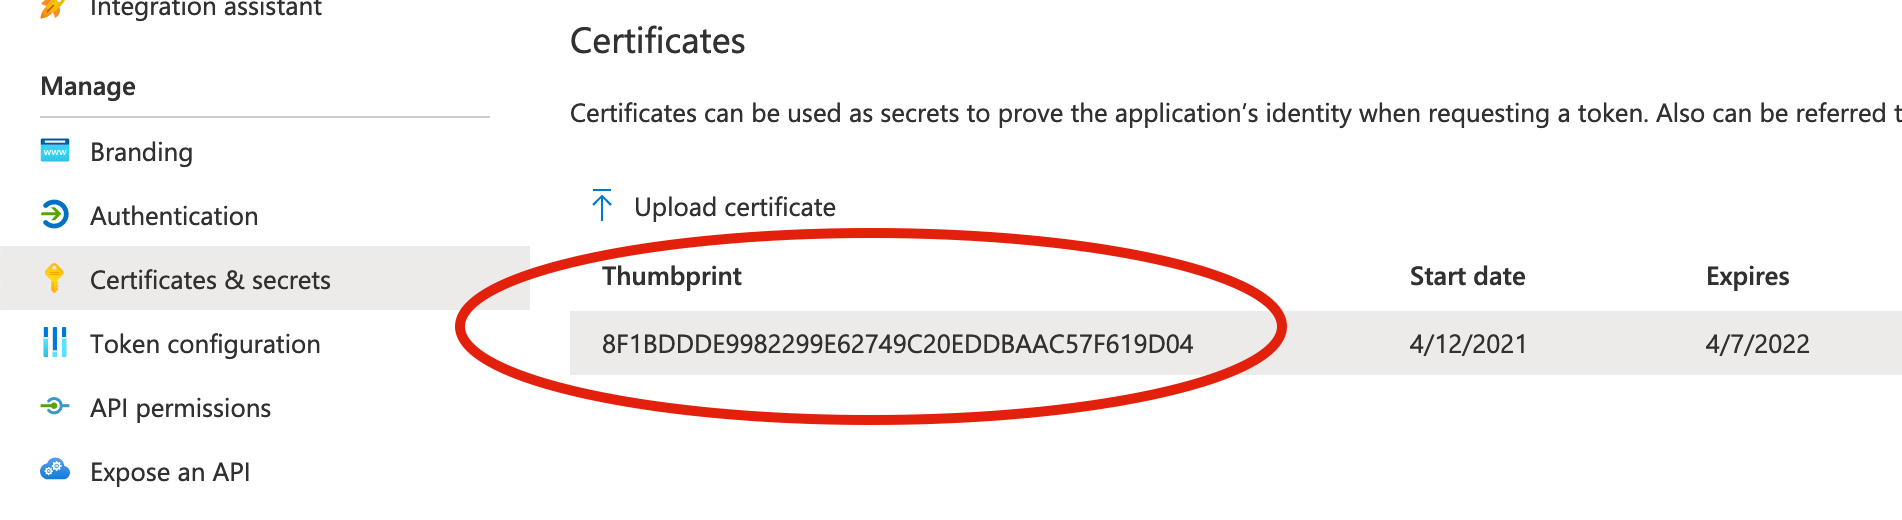
thumbprint: "8F1BDDDE9982299E62749C20EDDBAAC57F619D04"
include_jti_claim: true
scopes:
- https://storage.azure.com/.default
additional_claims:
aud: "https://login.microsoftonline.com/${TENANT_ID}/oauth2/v2.0/token"
iss: "${CLIENT_ID}"
sub: "${CLIENT_ID}"
bundles:
authz:
service: blob
resource: opa/bundle.tar.gz
Note that the $CLIENT_ID is what is referred to as the “Application ID” inside your Azure account.
Also note in particular how the thumbprint property is required for Azure. The value expected here can be found under “Certificates and Secrets” in your application’s configuration.
Nginx
Nginx offers a simple but competent bundle server for those who prefer to host their own. A great choice for local testing.
| Feature | Supported |
|---|---|
| Caching headers | Yes |
| Authentication methods | Bearer Token 1 OAuth2 Client Credentials JWT authentication 2 |
1Nginx does not support bearer token authentication, but it does support basic auth. This can be achieved by setting services[_].credentials.bearer.scheme to Basic in the OPA configuration, and simply provide the base64 encoded credentials as the token.
2Only available with Nginx Plus.
Upload Bundle
Either use the nginx-upload-module or upload bundles out-of-band with SSH or similar.
Example OPA Configuration
services:
  nginx:
    url: https://my-nginx.example.com
    credentials:
      bearer:
        token: dGVzdGluZzp0ZXN0aW5n
        scheme: Basic

bundles:
  authz:
    service: nginx
    resource: /bundle.tar.gz
OCI Registry
OPA is able to interact with OCI compatible registries to be able to download and use policies stored as containers. To configure OPA to use an OCI repository see the service configuration section
Structure The bundle container is composed of 3 layers:
- the manifest layer - contains the information about the tarball layer of the container(the digest, size, mediatype and annotations) and the config layer
- the bundle tarball layer - the actual bundle tarball
- the configuration layer - currently empty
For OCI compatible registries an oci folder is created in the persistence directory. If this value is not set, because the OCI downloader plugin requires a storage path, the system’s temporary folder location will be used instead. This folder should be maintained by the user. We recommend backing-up or cleaning up this folder periodically as this acts as a local cache for the OCI downloader.
Current Limitations The OCI Downloader plugin used by OPA has a couple of limitation:
- it accepts only one layer per image that contains the bundle tarball
- it can download only the following application media types:
application/vnd.oci.image.layer.v1.tar+gzipapplication/vnd.oci.image.manifest.v1+jsonapplication/vnd.oci.image.config.v1+json
Building and Publishing Policy Containers
There are multiple ways to build an image from a policy code base using different tools.
Using OPA and ORAS CLIs
To build and push a policy bundle to a remote OCI registry with the OPA CLI and ORAS CLI you can use the following commands:
opa build <path_to_src>will allow you to build a bundle tarball from your OPA policy and data files
Now that we have the tarball we will need to provide a config manifest to the ORAS CLI and the tarball itself:
oras push <registry>/<org>/<repo>:<tag> --manifest-config <you_config_json>:application/vnd.oci.image.config.v1+json <the_tarball_obtained_from_opa_build>:application/vnd.oci.image.layer.v1.tar+gzip
Using an empty({}) manifest-config json file should be sufficient to be able to push and allow the OCI downloader to use the remote policy image.
Maintaining a policy-as-code repository
One of the easiest method of managing your policy bundles is to store your code base in a hosted repository service like Github or Gitlab and set up an automated way to build and publish your code as a container to the desired registry using a CI(ex. Github Action).
Example
In this example we are using the ghcr.io OCI registry as the upstream repository and the OPA and ORAS CLI as our build and publishing tool.
Starting from scratch
Let’s set up a basic policy example structured as:
└── src
    ├── data.json
    ├── .manifest
    └── policies
        └── hello.rego
Here our hello.rego file contains a very simple example:
package policies.play

default hello = false

hello {
    m := input.message
    m == "world"
}
The .manifest file specifies the root only as:
{
    "roots": ["policies"],
    "metadata": {
      "required_builtins": {
          "builtin1": [
          ],
      }
    }
}
And the data.json file is empty json:
{}
Building your policy
To build my bundle tarball I’m going to use the OPA CLI and run the following command:
opa build .src/
Pushing the container to a remote registry
I’ll prepare an empty config.json file that contains:
{}
To push the build image to an upstream registry we first need to login using:
oras login ghcr.io
And now we can push our policy using:
oras push ghcr.io/someorg/policy-hello:1.0.0 --manifest-config config.json:application/vnd.oci.image.config.v1+json bundle.tar.gz:application/vnd.oci.image.layer.v1.tar+gzip
Spin up the policy with OPA CLI
Now that our image is pushed we prepare the OPA configuration.
In this example the configuration.yaml looks like this as the pushed image is private we need credentials for OPA to download it:
services:
  ghcr-registry:
    url: https://ghcr.io
    type: oci
    credentials:
      bearer:
        schema: "Bearer"
        token: "<mytoken>"

bundles:
  authz:
    service: ghcr-registry
    resource: ghcr.io/someorg/policy-hello:1.0.0
    persist: true
    polling:
      min_delay_seconds: 30
      max_delay_seconds: 120
In the above configuration we pinned the configuration to use the 1.0.0 tag of the image. OPA will identify this image by the tag and the descriptor SHA. If the SHA of the image is changed upstream, OPA will redownload and activate the changes.
If we run the opa CLI with this configuration using the command it will open an interactive terminal (REPL) where we can see the loaded bundle:
opa run -c configuration.yaml
The terminal should show that the bundle has been loaded and activated:
> {"level":"info","msg":"Bundle loaded and activated successfully.","name":"authz","plugin":"bundle","time":"2022-06-15T16:50:53+03:00"}
> data
{
  "policies": {
    "play": {
      "hello": false
    }
  }
}
> exit
We can now start OPA as a server using:
opa run --server --set default_decision=policies -c configuration.yaml
To interact with the server you can do a simple curl to verify if it works as inteded:
curl localhost:8181 -i -d '{ "message":"world"}' -H 'Content-Type:application/json'

HTTP/1.1 200 OK
Content-Type: application/json
Date: Wed, 15 Jun 2022 13:55:19 GMT
Content-Length: 23

{"play":{"hello":true}}
curl localhost:8181 -i -d '{ "message":"other"}' -H 'Content-Type:application/json'
HTTP/1.1 200 OK
Content-Type: application/json
Date: Wed, 15 Jun 2022 13:56:13 GMT
Content-Length: 24

{"play":{"hello":false}}
Feedback
Was this page helpful?
Glad to hear it! Please tell us how we can improve.
Sorry to hear that. Please tell us how we can improve.